Every year, I help people build touring setups, and I’ve found one major tip helps people make their decisions: manufacturers make 4 major weight classes of gear based on different purposes, and you’ll get the best results when your skis, boots, and bindings are built around a similar purpose and classification. Your body transfers input and power from your boots to your bindings to your skis, and things can get a little wonky when gear components aren’t in alignment with each other and your style of skiing.
We’ll start with the overall categories and then delve into specifics across each component of your setup:
- Skimo Race: Completely prioritizes weight over downhill performance and safety. The lightest, skinniest, shortest, most minimal gear that World Cup standards allows for people who do randonee races.
- Ultralight: Some preference to uphill weight over downhill performance and safety. This class is the most popular one in Europe. In the US, it’s more common to see these setups as “spring setups” that people use for vert-heavy, multi-day trips. They’re also popular for fitness skinning or beer league skimo racing. But some skiers may prefer this class for their primary touring setup. Ultralight gear is different enough from inbound gear that there may be a little bit of an adjustment to how the ski handles.
- Freetour: Some preference to downhill performance and safety over uphill weight. This is the most popular classification in the US where skiers want setups that can ski fairly similarly to inbounds gear. Most skiers land here since these setups do a decent job whether it’s deep powder days or multi-day spring missions.
- Hybrid: Total preference to downhill performance and safety over uphill weight. The skiing experience is indistinguishable from “regular” inbound gear. Great option for people who want to do double duty or get a ski they want to ride inbounds and out. I love this category for beginner-intermediate skiers since it puts them on a familiar setup when they’re ready for their first tours and it’s less gear to manage when the inevitably outgrow their first setup in a season or two. A little heavy for tours with overnight or glacier gear, but light enough for your first big volcano tours to Muir, Helens, or Adams.
Now before we dive into each component of your setup, two caveats. First, I want to stress your components should be built for a similar purpose and classification, not necessarily the same classification. If you’re aiming for a freetour setup, but your foot fits best in a hybrid boot, no big deal. Blending between tangential categories works alright. Mixing non-tangential categories where things get weird. Second, gear lies on a spectrum. The burliest freetour boots (like the Tecnica Zero G Tour Pro) weigh only 90g less than the lightest hybrid boot (Atomic Hawx Ultra XTD 130). That Hawx is 400g lighter than the heaviest options in the hybrid class. Categories help us understand and organize our options, but they aren’t the end-all-be-all. With that, let’s get into the components of a setup!
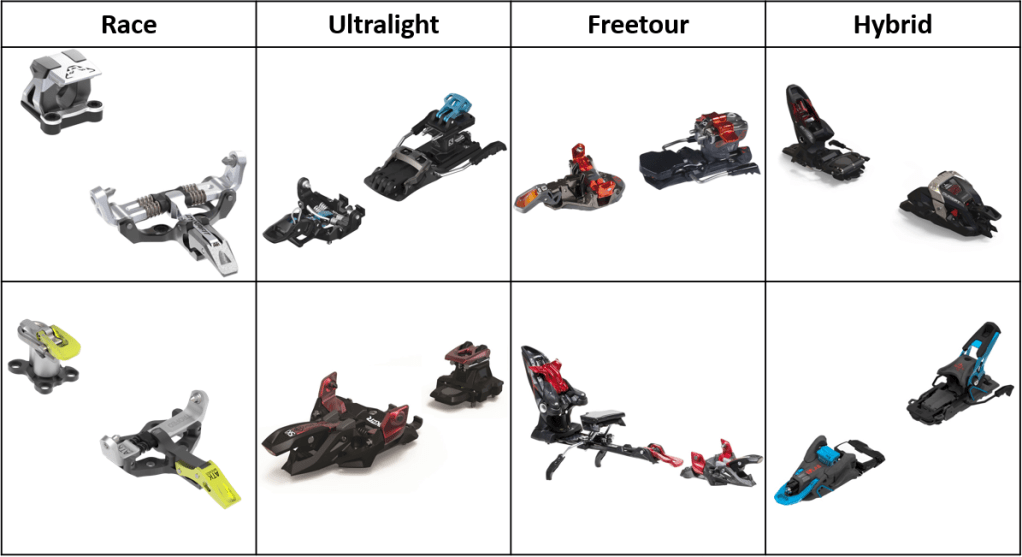
Bindings
We’ll start with bindings since they are by far the most complicated and varied product group that goes into a setup. Let’s do a quick overview of the technical terms before diving into the categories:
Adjustable DINs and DIN certifications: Adjustable DINs and DIN certification are not the same thing. I know, it’s confusing AF. Some bindings have adjustable DINs and they loosely correlate to alpine DIN settings, but they have not been proven accurate and consistent by an independent 3rd party and may not be able to pass parts of those tests for certification. There are 2 types of certification: inbounds and touring. Both ensure that the binding tests within the expected range while simulating falls from different directions, while the ski is weighted/unweighted or iced over, etc. Touring standards are slightly easier to meet than inbounds. Some bindings can let you change both the lateral and vertical DINs, while others only have lateral release adjustability and their vertical release is fixed.
Elastic Travel: Elastic travel is the distance your boot can make micromovements in the binding and not release. It’s different from DINs; DINs measure the force, elasticity measures distance. For inbounds skiing, park and freeride skiers are the only ones really considering elastic travel in their bindings. Losing a ski while landing a park jump or cliff drop can be really dangerous. Most of us mortals do fine with the industry standard (20mm in the toe, 10 in the heel). However, that changes for touring bindings, where some bindings lack elasticity all together. A little bit of chunder or sastrugi can pop your ski off, so consider more elasticity if you dabble in some consequential terrain like steeps, glaciers, or couloirs.
Mount Plate & Drill Pattern: Narrower toe pieces are necessary for narrow skis. But wider toe pieces provide better power transfer for wider skis. You’ll notice that some of the lightest bindings don’t offer brake options above 105-110mm, since they’re not designed to drive big fat skis. Likewise, burlier ones don’t have brakes below 90mm, since their mount plates are too wide for skinny skis.
BSL Adjustability: Once mounted, can the heelpiece be adjusted forwards and back, and if so, how far? BSL adjustment adds weight to the bindings, but it allows you to switch boots in the future and avoid having to re-mount them, and it also makes the skis more appealing to buyers if you choose to resell them in the future.
| Skimo Race | Weights between 100-200g and have little functionality outside of securing your boot to your skis. They have no brakes, no crampon slots, and no adjustability for different boot sole lengths. They only have 1 riser. DIN release settings are either fixed or have very limited adjustability (like choosing between 6 or 8). Some bindings are designed not to release at all. They have neither inbound nor touring DIN certification. All bindings have narrow plates that fit on 65mm skis. |
| Ultralight | Weights between 200-450g. They have crampon slots and some BSL adjustability (usually 10-30mm). Some have 2+ risers, which helps compensate for decreased range of motion in boots as they get burlier. Some have brakes, others don’t, and others are brake-optional. Brakes tend to max out around 105. A few go wider, but they’re not really designed to drive wide skis, as the mounting plates are still narrow (those with brakes go down to 80mm wide). They have adjustable DINs, but they do not have inbound or touring DIN certification. Some can set vertical and lateral DIN settings, while others have fixed vertical release settings. Some bindings have no elastic travel, while others have very little (4-5mm in the toe). |
| Freetour | Weights between 500-700g. They all have 2+ risers, which compensates for decreased range of motion in boots as they get burlier. Brakes are the norm, and range from 85mm to 135mm, showing that these bindings are appropriate for bigger and wider skis. DINs are adjustable, both for lateral and vertical release. Most of these bindings have Touring DIN certification. DIN certification is possible due to the better elastic travel. (Most have 9-11mm in the toe, and the Fristchi Tecton also has 9mm in the heel). The Tecton and Kingpin also stand out for being “mullet” bindings. They’re pins in the front, but clamp like an inbound binding in the back, which improves power transfer and reduces some safety concerns for pin bindings. |
| Hybrid | Weights are over 800g. In downhill mode, these bindings work just like an inbound binding, by clamping down on the toe and heel welts. They meet inbound DIN standards and have toe and heel elastic travel that’s also the same as inbound norms. The Salomon Shift and Marker Duke PT are “transformer” bindings that connect to pin inserts for the skin up. Other options in this class are frame bindings, which are quickly going obsolete. |
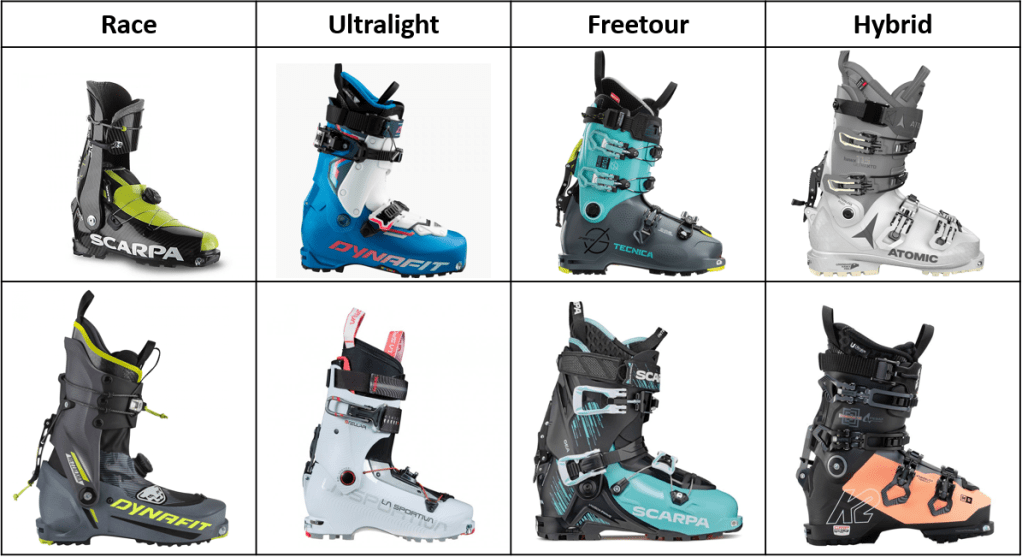
Boots
| Skimo Race | Weights between 500-900g. Look like “those Balenciagas, the ones that look like socks” and are about as stiff. Only 1 buckle, plus a BOA closure or Velcro strap. Boots have 60-80deg of cuff rotation, meaning skiers ankle ROM is largely unencumbered and they can take long strides. Most have no toe welt or heel welt, making them incompatible with bindings like the Kingpins or Shifts. Soles are rockered under the ball of the foot to make running and walking ergonomic. Soles are high traction, low durability rubber. |
| Ultralight | Weights between 1000-1200g. Boot cuffs are noticeably shorter than inbound boots to save weight. Almost all boots have 2 buckles. Boots have between 60-75deg of cuff rotation. A few boots have a toe and heel welt to work with a Kingpin or even Shift binding, but most do not. Sole is still rockered underfoot for ergonomic walking and climbing. Rubber soles start to move away from traction and towards durability. |
| Freetour | Weights between 1200-1350g. Boot cuffs approach inbound height, and like inbound boots, they have 3-4 buckles and a power strap. Boots have between 55-60deg of cuff rotation; it may restrict some ankle ROM, but it can accommodate most normal skinning strides. Boots approach the flex of an intermediate-advanced inbound boot. Soles are almost all ISO 9523, which works with bindings like the Kingpin and Shift. Soles are still rockered underfoot for ergonomic walking and climbing. Most use a light, strong, licensed plastic called Grilamid that makes the boot quite expensive. Some have a PU or Pebax version that is marketed as a slightly softer boot (like the Dynafit Radical vs Radical Pro or the Tecnica Zero G Tour vs Tour Scout). The main difference is the price point and materials, and the cheaper option tends to weigh ~20% more and weigh more like a Hybrid boot. |
| Hybrid | Weights are over 1350g, ranging up to 1650g in the women’s market. Boots fit and flex almost identically to their inbound counterparts. They have between 40-55deg of cuff rotation, which may restrict some skiers’ strides, depending on your body’s geometry and mobility. The biggest change is that boots use a GripWalk sole. These soles are almost completely flat but have rubber grippers on the bottom of them that traditional inbound soles do not. The flatter sole makes compatibility with inbound bindings easier to accommodate, and roughly 80% of inbound bindings have GripWalk compatibility. These boots usually get cheaper than Freetour since they use heavier, more affordable plastics, but a few select models, like the Hawx 115 models still use Grilamid. |
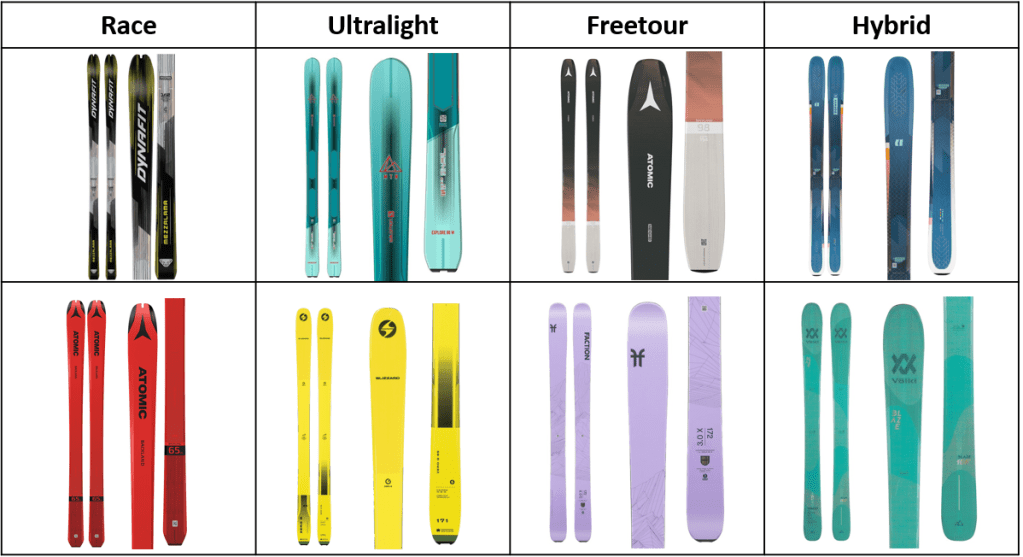
Skis
| Skimo Race | Weights between 600-800g. 60-65mm wide. Only comes in a few sizes (usually right over 150cm and right over 160cm to comply with ISMF minimum ski lengths for women and men, respectively). They have cap construction instead of sidewalls, which reduces weight, but sacrifices edge hold, torsional stiffness, and durability. |
| Ultralight | Weights between 950-1250g for lengths in the mid-160s. Skis are between 75 and 90mm wide. Some have cap construction, while others have ABS sidewalls. The wider waists give them some versatility in different snow conditions and the heavier weights give them some added stability at moderate speeds or in inconsistent snow. |
| Freetour | Weights between 1200-1350g for lengths in the mid-160s. Most skis are between 95mm wide up to the mid-100s, but there are a few powder-oriented freetouring skis like the Pandora 110, Armada VJJ, and DPS Pagoda Tour 112 that use lightweight construction in a pow-specialty tool that are closer to the 1400-1500g range. These are very similar to the all-mountain and mid-fat skis that you have as your daily driver in your inbound quiver. These just save weight (and add cost) by using more lightweight carbon. They perform almost as inbound gear at speed or in variable conditions unless you’ve got a super burly inbound ski with metal laminates. Almost all have sidewalls or hybrid “semi-cap” construction that help these hold an edge and dampen out vibration. Voile skis are the major exception. |
| Hybrid | Weights over 1350g for lengths in the mid-160s. These skis are also from the mid-90s in width up to the widest powder skis. Heavy enough to perform well for light to moderate inbound skiers, especially ones that aren’t wildly aggressive, but also light enough to drag uphill. Because these skis are also sold to the inbounds market, they tend to cost less (heyo economies of scale!) and they also have way more review coverage, especially if you’re seeking out women reviewers. |
- What if I really want to mix and match very different categories? As long as your gear is physically compatible, drastically different gear can be mixed and matched and be functional. However, this is where I hear more complaints when someone isn’t satisfied with their original choices. Anecdotally, when they’re re-sold, they tend to move slower and sell for bigger discounts. If you’ve given your setup a lot of thought or are making the most cohesive setup you can on a budget, it totally makes sense.
- What if I’m not sure what category is best for me and my goals? Freetour and hybrid setups are the most popular in the market and have the most binding adjustability, so they hold the most value if you choose to resell them. The Line Pandora, Armada Trace, and Atomic Backland are all safe places to start. Very “democratic” skis that work for a wide range of ability levels and ski styles. They also have more review coverage than more niche lines or brands. Lean on the Freetour side if you hate cardio or already do lots of mountaineering where you’ll likely be taking skis along on your vert-heavy days. Lean towards the hybrid side if you’re an aggressive skier who doesn’t want to adjust your style when you leave the resort. As I mentioned, I also like hybrid gear for progressing skiers, especially here in the PNW where terrain is steep and heavily treed. The extra power transfer will help maximize the level of control you feel on challenging terrain. Plus, it has the safety features and durability to really get familiar with your setup inbounds.
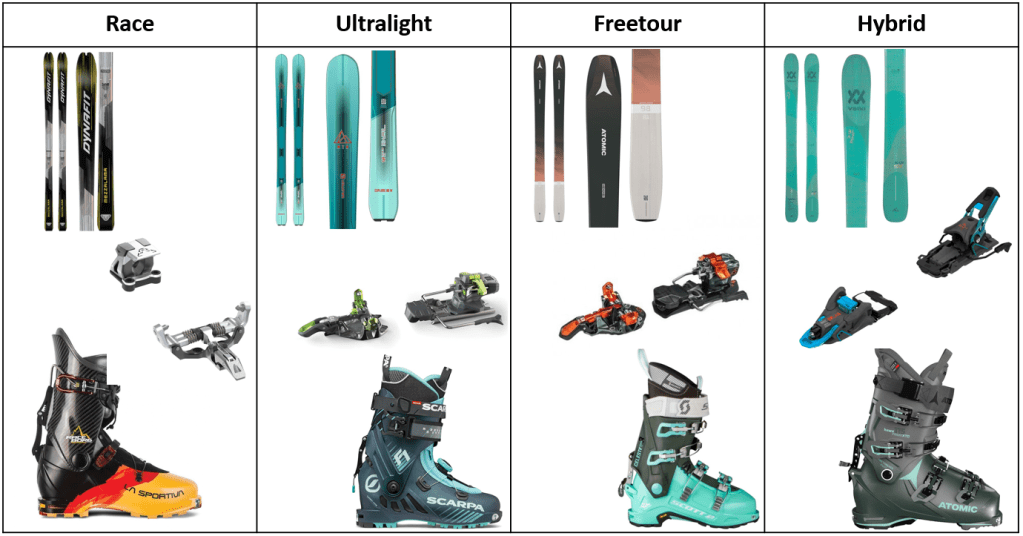
So putting it all together, here’s a sample setup from each category:
Want to stay in the loop for more women’s ski chatter? Follow along on Instagram or hit the follow button below for email notifications for new posts!

Hi FemiGnarly, for accessibility reasons, could you please include the makes and models of the gear in the pictures into Alt text or a caption? All the information you provide is super useful, but it’s impossible to tell what gear you’re actually recommending when using your website for the visually impaired or on a mobile phone. Thanks!
LikeLike
Yea! The pics are easy to update. Tables are a little more difficult with the current site hosting setup but a provider switch is the works and should open up better options for plug-ins and site capability
LikeLike